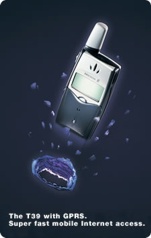
 Ericsson T39 Email Access over AT&T Wireless
Use the email client in your T39 to access email at your dial-up ISP
Also applies to Ericsson phones that are similar (e.g., T68)
Requires AT&T Wireless Data Connect (GSM Data) or ISP.Cingular
(GPRS)
Copyright 2002 John Navas, All Rights Reserved.
Permission is granted to copy for private non-commercial use only.
Posted as <http://attwireless.navasgroup.com/email_csd.htm>.
NOTE: This information was compiled by the author and is provided
as a public service. The author has no connection to AT&T Wireless or Ericsson
except as a customer. The author is not responsible for any errors
or omissions, or for any consequential problems that might result. USE
AT YOUR OWN RISK.
Contents
See also:
Email comments and suggestions to John Navas.
Getting Started
- First setup a Data Account:
- Then setup at least one account in the phone for your Email at your
dial-up ISP:
- MENU: Messages
 Options
E-mail
Edit account
Add new?
Options
E-mail
Edit account
Add new?
- Account name: [enter descriptive name; e.g., "My
Mail"]
- Connect using: [select Data Account you created above; e.g.,
"My ISP"]
- POP3 server: [enter ISP server name for receiving
mail; e.g., "pop.example.com"]
- POP3 port: 110 [set by default; should normally not be
changed]
- Mailbox: [enter email user id assigned by your ISP, often but
not always the same as your dial-up user id]
- Password: [carefully enter password for your email user id,
often but not always the same as your dial-up password]
- SMTP server: [enter ISP server name for sending mail;
e.g., "mail.example.com"]
- SMTP port: 25 [set by default; should normally not be
changed]
- Email address: [enter your own email address; e.g.,
"userid@example.com"]
- From name: [enter your name; e.g., "John
Doe"]
- Signature: [select "No signature" unless you have
entered a "business card"]
- Copy outgoing: [select On or Off]
Handy for automatically sending copies of your outgoing email to a
fixed address. If you select On, you will be prompted:
- Copy outg. to: [enter copy-to email address; e.g.,
"myotherid@example.com"]
- Check interval: [select Off unless you want your phone to
periodically check for new email automatically]
- Press and hold
 to return to main screen
- If you setup more than one email account, select the account to use:
- MENU: Messages
Options
E-mail
Set account
- Select account, and press
- Press and hold
to return to main screen
Important Notes
- As a security measure, some ISPs will only allow you to retrieve (POP3) email from their own dial-ups, not from other Internet connections.
- As an anti-spam measure, many ISPs will only allow you to send (SMTP) email from their own dial-ups, not from other Internet connections.
- Older versions of T39 firmware have a bug that prevents sending email unless there is at least one message waiting to be retrieved. If your
firmware has this bug, and your mailbox is empty, the workaround is to send yourself a dummy
email by SMS.
- The phone normally resolves the POP3 and SMTP server names to actual IP
(Internet) addresses using DNS server(s) that are usually assigned automatically by the ISP when a connection is made. If this is failing, you can try actual IP addresses (which look like
"nnn.nnn.nnn.nnn"
where n's are numeric digits) instead of POP3 and SMTP server names.
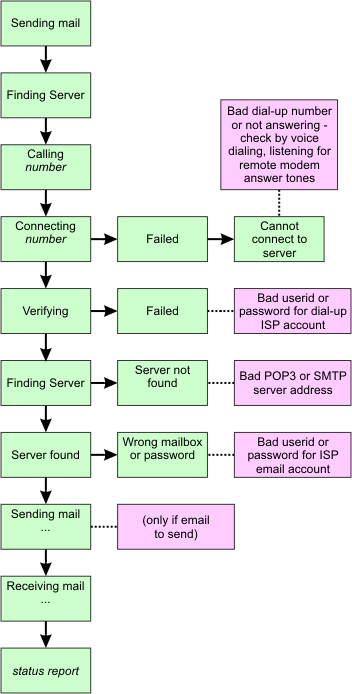
Troubleshooting
The leftmost column is the normal sequence of screens when the T39 is sending
and receiving email. Screens on paths leading to the right are displayed when
something goes wrong. Boxes attached by dashes explain the probable cause of the
problem. In the case of "Bad POP3 or SMTP server address", see Note
4 above. Note that "Calling" does not apply to GPRS.
Sending Email By SMS
Depending on your area, the phone number of the AT&T Wireless SMS-to-Email gateway
is either:
- 111 (e.g., North Carolina)
- 121 (e.g., San Francisco Bay Area)
See what works, or check with AT&T Wireless for
the correct number in your area.
The From address in email sent through the Email Gateway will just be
your cellular phone number, so you may want to put your name in the
body of the message.
To use the AT&T Wireless Email Gateway, you have two basic choices:
- Configure your phone to use the Email Gateway automatically
- MENU: Messages
Options
SMS
- E-mail gateways
- If the gateway is not configured (correctly) for
your area:
- Add new?
- Number: [enter correct gateway number for your area (as
described above)]
- Message type
- Set on send
- Set on send: On
(see Note below)
- Press and hold
to return to main screen
Note: With the Set on send turned On (as configured
above), the phone will give you a choice when sending an SMS message:
- If you choose Text, you will be prompted for the destination
phone Number.
- If you choose E-Mail, you will be prompted for the destination
email Address (which you can reference in your addressbook with
the left arrow key), and the phone will then automatically format the
message correctly and sent it to the Email Gateway.
- Send the message manually to the Email Gateway
- Put the destination email address at the beginning of the "Text:"
field, followed by a space, followed by the actual text of the message; e.g.,
userid@example.com This is a test message.
- For "Number:" enter the correct Email Gateway number
for your area (as described above).
 [The Navas Group home page]
 |
|
Trademarks belong to their respective owners |